Table of Content
This should be done in an area not well lit and while emulsion is drying keep screen out of light. Use a cotton fabric to protect the image by covering the image with it and then ironing it over the fabric. Take your t-shirt and lay it flat on your table. Make sure it is smoothly and evenly laid out without wrinkles. Iron your shirt if you need to remove creases because these could create marks on your final result.
To apply the silk just use a regular staple gun. Pull it tight, but not so tight that the silk rips through the staples. You can also fold the silk under so it isn't as likely to rip. I'm curious where you got the grey shirts with the different colored stitching around the neck as seen in the last image. Sorry, but this browser or your browser version is not supported.
Pick & Print an Image
You can add different colours to different sections of a design by covering areas you don't want to print with paper. For this design, I could have printed the sun first in yellow, then covered it up to add a layer of blue ink. Alternatively, you could create a separate template for each colour if you're planning to do a large number of prints. Cover the screen with the ink using your squeegee.
Put it on when you go out and show off how good of quality a t-shirt can be, even when not using expensive silk screening machines. IF all this DIY seems like a lot of work you can buy an entire starter screen printing starter kit that includes THE SCREEN, PHOTO EMULSION, FABRIC PAINTS, A SQUEEGEE and more. In your dark room,run a bead of emulsion across the top of your screen.With your squeegee, draw the emulsion down over the entire screen on both sides. Make sure you have a nice even coat, but work quickly. Do one side, then the other and then immediately put the screen in a dark area to dry.Set it down horizontally, not vertically.
Choose the type of message you'd like to post
This process solidifies the emulsion to the silk screen mesh, making it permanent and reusable. Cover the stencil with something opaque, like the chipboard provided in the stencil packs. Keep the stencil covered to prevent additional light from pre-exposing the stencil until you are ready to expose to light source. Once you have made sure that the glue has completely dried, place the embroidery hoop face down on the t-shirt and slowly start inking the t-shirt. Make sure that it looks like it is fully set in, but don't feel that you need to apply too many coats to achieve a good quality image. It also might be helpful to place a piece of cardboard between the front and the back of your shirt, so that the ink does not bleed through the material.
One could trace right before painting in the glue. Some of the markers of the same type only come out once they get wet, but all must be tested to see if they will leave a stain. Take the sheer fabric that you have found, as well as the embroidery hoop that you purchased for cheap. Stretch the fabric as tight as you can across the embroidery hoop, but it is delicate, so be careful to not stretch it too hard.
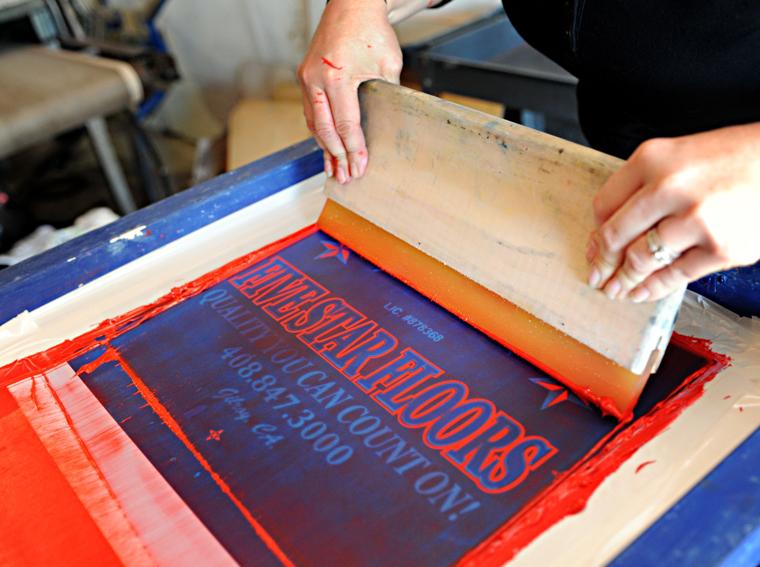
Drag Paint Along Your Mesh
It really isn't all that difficult and for what it takes in energy it more than gives back in fun. All of the emulsion surrounding your image is now cured hard. The spot where your image is, has not been cured and therefore will wash away. Place the prepared screen on your black matte background.The "back" of the screen will be facing up.
Take desired ink and spread across screen below image. Take squeegee and pull ink through screen. Best results for pulling squeegee are at a almost a straight up and down angle. A test pull should be done first to check for any discrepancies etc. Take textile and place on platen for desired placement and continue with print. Coat screen with photo sensitive emulsion.
Step 2: Finding an Image
It takes a while to figure out the right exposure time for your images. You also need something that's matte black to put your screen on for the exposure. A black piece of cardboard or bristol board would work well too.
Emulsion side should be facing up towards sunlight (5-10 minutes). If it's windy, place weights on the stencil like tiles from a hardware store. Rotate the tiles so the stencil cures evenly. Soak in a sink or bucket of tap water for a minimum of 15 minutes.
You could use an old very thin scarf if you have such. Pantyhose (often called "nylons" after the old style nylon hose people used to wear back in the 50's) are delicate and so easy to damage. Silk screening was done with thin silk, and is now done with a thin nylon fabric. You’ll have two choices when buying a screen printing frame. They’re only a few more dollars and infinitely better.This is a good, inexpensive starter frame. To make your own screen printing frame screw 2x2's together like I've done below.

Print your shape or letters onto a regular piece of paper. You can also print it on transparency paper but that's not necessary until you get to more detailed images. Carefully cut out the image with an Exacto knife.
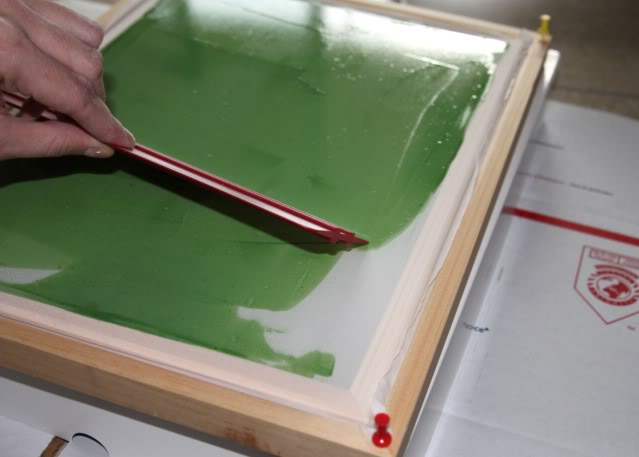
Pour some paint at the top of your screen, then take your squeegee and drag the paint to cover your image. Pressure changes will affect the clarity of your final image, add pressure if you want an intense image and less pressure for a less intense image. You are flooding the image, meaning filling it up until it is covered with your paint.